X- Men #19 Cover

Hey Guys,

Here is the step by step process behind the X- Men #19 cover.


For the process of this cover I was asked by the editors to do a jungle scene of the X-men and the Fantastic Four having as reference the 90’s X-men covers. I sent the first layout but the editors wanted a more dynamic angle and composition so we narrowed down to sketch number two.


I set the sketch as a basis and I did a trace over on the cintiq until I got the pencils to the level I wanted.


Now I set the flat tones to start the coloring process. I already had in mind the feeling of the scene so I wanted to have colors that represent a sci- fi other dimension feel that the story has, trying to stay away from the typical jungle scene colors.

I tend to set mid tones and use that as a starting point to go darker and lighter.


Then I set my first step of shadows using a “multiply” layer on top of my basic colors, I also tried to work some of the lightning on the background just to have a quick idea of how I want to whole scene to look.


At this point I started laying the lights just adding a regular layer on top of my shadows but under my pencils. I decided to have two light sources: one coming from the right side as sunlight hitting directly at the characters and the other one coming from the left side as an ambient lighting.


Once I had all my colors laid out I compressed all the layers and worked on top of my single file getting rid of the pencil work.

In this image you can see that result on wolverine’s face. I went over the whole image using this process.


Once I polish the whole image I start adding some light effects like fog and the sunlight on the right as well as a couple of highlight on the metal materials. Then I go over the image to do a bit of color correction until I’m completely satisfied with the final result.


Follow me on twitter @jorge_molinam

Facebook fan page
http://www.facebook.com/pages/Jorge-Molina/170336213026821?ref=ts

X- Men #19 cover

Hey Guys,

Here is the X- Men #19 cover. I will post the behind the scenes soon, Follow me on Twitter @jorge_molinam if you want to know all about it!

All photoshop CS5.


Behind the Scenes: New Mutants # 28 cover


Hey guys,

Here is the process of the work behind New Mutants #28 cover.


These are the three layout sketches I sent to the editors. I was asked to have Magic from New Mutants in a jail cell hunted by her demons so I nailed the three quick composition sketches and sent them for approval. I do these sketches all in photoshop.


I did these entire image digitally because I wanted to try something new on my technique, I never try coloring over gray tones of shading so I decided to give it a shot. At this point I take the approved sketch and do a clean version on top of it just by tracing over it on photoshop.


When I’m done with the clean lines I set on “multiply” on photoshop to begin the coloring process. At first I set five tones from white to black so for the most part of this process I work strictly with this tones.

The main idea of why I wanted to try this new process of coloring was to get a better feel of the volume, the lighting on the scene and the characters. Usually when working straight on colors is hard to proceed the tonal values because of the amount of color variety on the image. So by sticking only to gray tones I can focus on the shapes and tonal values.


At this point I usually use a regular hard edge brush with 70 % in opacity and 25% on flow.


Once I layout all the gray tones on the image I start going over the lines and cleaning all the edges from the pencil lines.


When I was at this point I started to get nervous since this was the first time I try this coloring technique and I had no idea how to lay colors on top of the gray tones.


So I started looking for a couple of tutorials on the web on how to work on it.

http://www.imaginefx.com/-2287754330544769555/Combining_traditional_and_digital.html

http://www.3dtotal.com/


At this point I’m pretty much learning by trial an error and I started laying colors on layers from “multiply “and “color.” I really don’t remember the exact process I used for this since I don’t have the technique nailed down but I had a really clear idea of how I wanted the image to look in the end so from the beginning I knew I wanted a defiant looking Magic with lots of cold tones and the moon lighting on the jail cell.
Once I’m done with all the coloring aspects of the image I start adding textures like the walls and the floor.


This is the final result, I hope you guys like it.


MORE COVERS COMING SOON.

Follow me on twitter @jorge_molinam

Facebook fan page
http://www.facebook.com/pages/Jorge-Molina/170336213026821?ref=ts

New Mutants #28 cover

Hi guys,

Here's the cover of New Mutants #28.

I'll be posting the process of this cover on the following days.

All photoshop CS5.


Follow me on twitter @jorge_molinam
Facebook Fan Page
http://www.facebook.com/pages/Jorge-Molina/170336213026821

X-MEN LEGACY

Some Pages from the X-MEN LEGACY.

Page 3.


Page 5


Page 11


Page 15.

San Diego Comic Con

Hey guys,

Here are my signing hours for the SDCC. Come visit me!

Thursday 12:00 - 12:45 pm (Archaia booth #2543)

Friday 02:30 - 03:15 pm (Archaia booth #2543)

Saturday 02:00 - 02:45 pm (Archaia booth #2543)
4:00 - 5:00 pm (Marvel Booth #2329)

Sunday 12:00 - 12:45 pm (Archaia booth #2543)
1:00 – 2:00 pm (Marvel Booth #2329)

Model Sheets

This is a personal design for a project I'm doing in my spare time.
I hope you like it.


Behind the scenes of the Fear Itself: Wolverine #3 cover

Hey guys,

Here is a step by step process of the work behind Fear Itself: Wolverine #3.


The editors requested a cover showing Wolverine tied to a bomb falling on New York. I looked for icons in reference to this city like the Statue of Liberty or Manhattan that people could identify easily.For the composition of these three layouts I used sketch up for 3D models , google earth for city landscapes and photo reference from time to time.Once the sketches are done I send them to the editors for approval.


Once the editors narrowed down to one image I start the sketching process. The editors gave me a tight deadline so I did some rough sketches (digitally on photoshop) instead of the finish pencils.At this point I already know I want a full painted image so I don’t need to worry about having clean pencils.


Then I started working with flats to define the shapes in the image.


Then I began working the lights and shadows, using various levels of Multiply. I drew an arrow above the character to be conscious of the light source.For this image I chose to use warm tones so it could have a clean and clear look.


Once I get to the final stage I tend to add a couple of effects like blurs to give more depth and dynamism to the image, I also make some color corrections to get to the feeling I have in mind.


Follow me on twitter @jorge_molinam
Facebook fan page http://www.facebook.com/pages/Jorge-Molina/170336213026821?ref=ts


Fear Itself: Wolverine #3

Hey Guys,

Here is the cover for Fear Itself : Wolverine #3.

This issue should be out in September.

I´ll be posting on twitter and in my blogger the process of this cover on the following days.

All photoshop CS5.

Follow me on Twitter @jorge_molinam

X- Men #17 process

Hey guys,
Here is a step by step process of the work behind X-Men 17 cover.


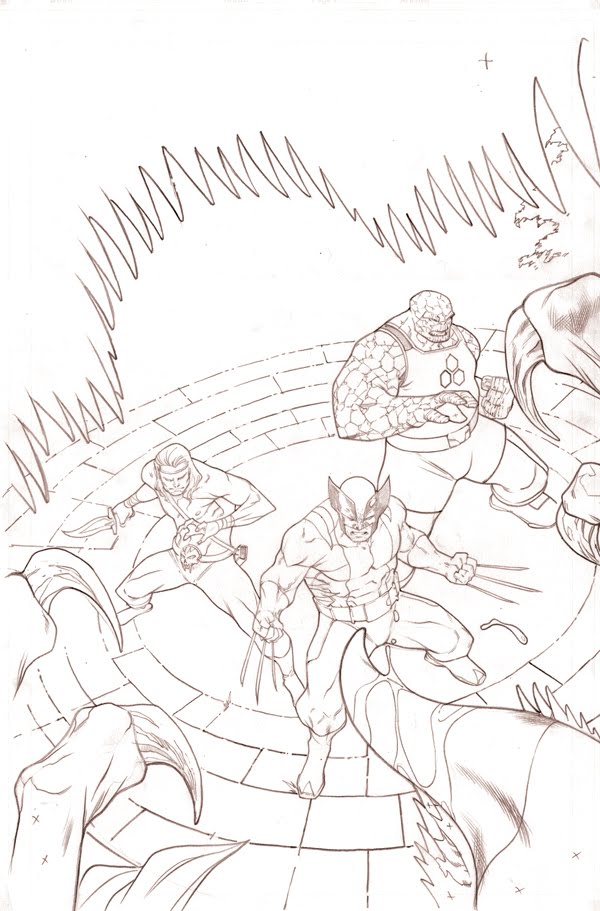
The editors requested a cover showing this three characters: wolverine, Skully, and Thing in a fighting related pose. So I sent this three layouts to start off and got the first one approved.


Once I get the sketch approved, I start working on the digital sketch, I try to add more detail and make the scene more dynamic. This whole process is done on photoshop. Once the sketch is done I do a print out to do a trace over with the light table.


At this point I go with the final lines, doing more detail work on the characters and refining the whole drawing. Ideally I would like to add more depth and detail to this stage but since I´m tight schedule I leave those details for the painting process.


Once I scan the final pencils I start working the colors on photoshop. I start of by doing flat tones to make a basic foundation for the coloring process. At this point I know I want a warm feel for the final piece so its very important to lay down those tones.


I start laying shadows with multiply and start working some of the lighting in the background. I tend to go opposite on my shadow tones to make it more dynamic, meaning if I have warm basic tones I like cold tones for the shadows.


Then I start laying some of the lights on the characters by adding a layer on top of my shadow tones and base tones.


As a final stage I tend to go over the whole image and clean up any missing lines from the original drawing, do some color corrections and add a couple effects.


Follow me on twitter @jorge_molinam
Facebook fan page http://www.facebook.com/pages/Jorge-Molina/170336213026821?ref=ts

X- Men #17 cover


Hey Guys, Here is the cover for the X- Men #17 issue that will be out in September.

Follow me on twitter @Jorge_molinam if you want to know more about the behind the scenes of this cover.

All photoshop CS5. Pencils 2H.


X- Men #16 cover (Dr. Doom and Magneto)


Hey guys,

Here are a couple of sketches I sent to the editors for approval and after a lot of editing we narrowed down to a single image. The idea of the cover is to show this two main villains in a larger than life posing but also reflecting some type of alliance between them.


I was happy with the final result and I think I achieve the final idea.

Random sketches


Here are a couple of random sketches I did in my free time. Some of them are from Dexter, others from Jackass, and the rest of them are people I saw at a mall.


X- Men 16 cover

Hey guys,
Here´s a little sneak peak of the latest tittle I´m working on.
For the fist time fantastic four and X-men get together along with Dr. Doom and Magneto.
All Photoshop CS5.

Fear Itself cover


This is the cover for FEAR ITSELF: WOLVERINE #2. All done in pencil inks, colors in photoshop.

New Mutants cover 25


Here´s a little behind the scenes work from the New Mutants cover 25.
I first did the 3 sketches and I sent them to the editors. I usually do all this process digitally on a cintiq.
Once the editors pick one of the layouts I start working on the finish pencils. I usually do a printout of the layout and do a trace over on the light table for the clean pencils.
Then I go to photoshop to apply colors till I get the final render.


I´m very happy with the final result since it was a rushed job.


For my eyes only

This is a drawing I did in my spare time, it doesn´t have any meaning... well, it could be just an interpretation from my subconscious


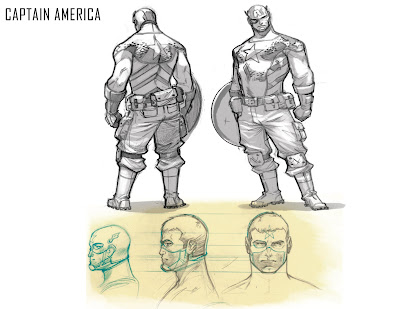
Captain America Process


Hey guys,

It´s been a while since I last updated my journal. Right now I´ve been working on X-men legacy, I´ll keep you guys posted with some images.

Also I´m very happy to announce I now have a two year exclusive contract with Marvel, I´ve been having a great time working for them and hopefully some cool artwork will come from that.

Here I uploaded a layout sample of my work process, I usually do all my layout digitally on the cintiq, then I do a printout and with a light table I do the final render.


El garabato

Hola todos si eres de Mérida te invitamos a unirte nuestro grupo
el garabato

Nuestro objetivo es crear una sociedad de artistas emprendedores con motivación a dibujar libremente, nos puedes encontrar todos los sabados a las 10:30 am en la Plaza Mayor (Segafredos, Carls Jr., Wok to walk)
Estaremos visitando distintas locaciones todos los fines de semana para dibujar.
¡Es completamente libre, sal y dibuja!

Encuentranos por:
Facebook: http://www.facebook.com/pages/El-Garabato
y en Blogger: http://elgarabatomerida.blogspot.com/